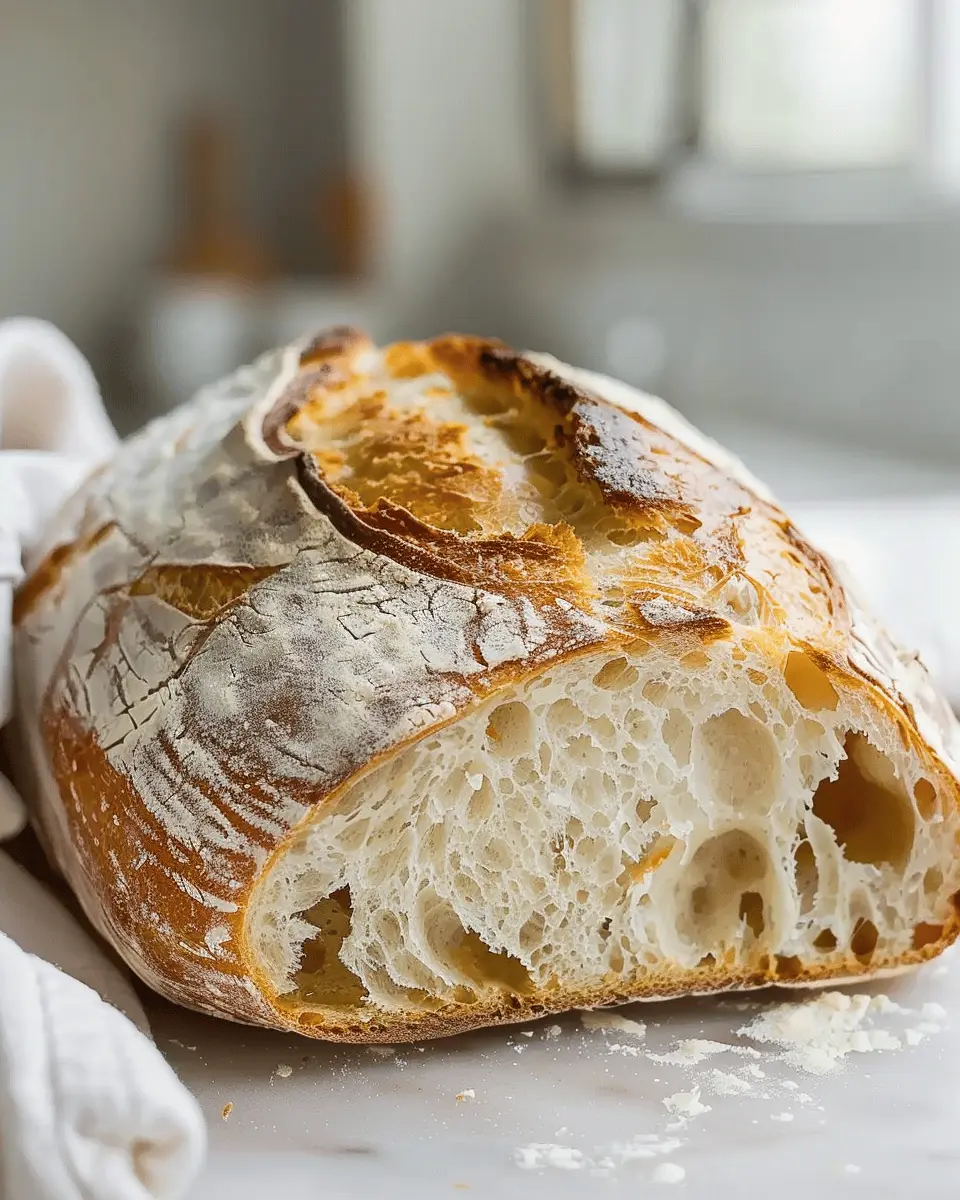
Introduction to Artisan Bread Recipe
If you’re a young professional juggling a busy lifestyle but craving something delightful, an artisan bread recipe could be your new kitchen companion. Imagine coming home from a long day, and the warm, inviting aroma of fresh bread fills your apartment. Not only does this artisan bread offer a taste that store-bought options simply can’t match, but it also allows you to connect with the art of baking—a rewarding respite from your hectic routine.
Why Homemade Artisan Bread is a Game-Changer for Young Professionals
Let’s face it: after a long workweek, the last thing you may want to do is spend your time searching for artisanal bread at the grocery store. Instead, why not take a therapeutic approach and create your own? Baking your artisan bread offers several incredible benefits:
- Empowerment: There’s something incredibly satisfying about crafting your own food. The hands-on experience allows you to take charge of what goes into your bread, meaning no preservatives or unwanted additives.
- Cost-Effective: Purchasing artisanal bread can add up quickly, often costing several dollars per loaf. By making your own, you can save money while enjoying an even fresher product.
- Customization: Does your palate long for a nutty taste or perhaps herbs? With homemade artisan bread, you have the freedom to experiment with various ingredients that can elevate your baking game.
- Quality Time: Baking can be a delightful solo activity, or it can be a great way to bond with friends or loved ones in your kitchen. Why not host a small baking night?
Plus, you can pair your artisan bread effortlessly with a hearty soup or a refreshing salad to create the perfect meal. With this guide, you’ll be well on your way to enlivening your dining experiences with your very own homemade loaf.
So, dust off that mixing bowl and let’s get started! This journey into the world of artisan bread will not only elevate your meals but also make you feel like a culinary artist right in your own home.
Ingredients for Artisan Bread
When baking an artisan bread recipe, the beauty lies in its simplicity. You only need a few quality ingredients to create a delicious loaf that’s crisp on the outside and soft within. Here are the must-have ingredients for the perfect loaf:
Must-have ingredients for the perfect loaf
-
Flour: Choose a high-protein bread flour for the best gluten structure. Brands like King Arthur Flour are often recommended for their consistent quality.
-
Water: The backbone of any bread, the water should be warm but not hot. This helps activate the yeast and encourages good fermentation.
-
Yeast: Opt for instant yeast for convenience; it can be added directly to the flour without proofing.
-
Salt: Enhances flavor and controls yeast activity; coarse sea salt or kosher salt works nicely.
-
Optional add-ins: Consider experimenting with ingredients like seeds, nuts, or herbs to elevate your bread.
Baking artisan bread can be genuinely rewarding, so make sure to savor the process. Whether you’re a seasoned baker or just starting out, preparing with these quality ingredients lays the foundation for a truly exceptional loaf. For even more insights about artisan bread recipes, check out resources from the Bread Bakers Guild or BBC Good Food. Happy baking!
Step-by-step Preparation for Artisan Bread
Baking artisan bread at home is not only a rewarding experience but also a delightful way to impress friends and family. The aroma that fills your kitchen while baking is irresistible. Are you ready to embark on this culinary journey? Let’s break down the process step by step.
Gather your ingredients
First things first, let’s gather our ingredients. You’ll need:
- Flour: Use high-quality bread flour for the best texture.
- Salt: A must for flavor enhancement.
- Yeast: Opt for active dry yeast or instant yeast for easy activation.
- Warm water: About 110°F (43°C) is ideal.
- Optional: A bit of honey or sugar can give the yeast a little boost.
Using the right ingredients is crucial for a successful artisan bread recipe. Check out this guide to baking essentials to learn more about each component.
Mix the flour, salt, and yeast
In a large mixing bowl, combine the flour, salt, and yeast. It’s vital to keep the salt and yeast separate initially because salt can inhibit yeast activity. Stir them together gently until evenly mixed.
No need for fancy kitchen gear here—a good ol’ wooden spoon or even your hands will do the trick. Did you know that mixing by hand helps to incorporate some air, which is beneficial for the dough’s rise?
Combine with warm water
Now, it’s time to add the warm water. Pour it slowly into the dry mixture, stirring with your spoon until everything is combined. You’re looking for a shaggy, sticky dough; it doesn’t need to be perfectly smooth yet.
If you’re curious about the science behind hydration levels, this article on dough hydration explains how water impacts the final loaf.
Let it rise and develop flavor
Cover the bowl with a damp kitchen towel and let it rise at room temperature for about 8 hours, or overnight if possible. The longer the dough rests, the more flavor it develops. This is where the magic happens! During this time, the yeast will ferment, turning sugars into carbon dioxide, which creates those lovely bubbles in your bread.
Pro tip: You can give your dough a quick “turn” every couple of hours by folding it in on itself. This helps develop gluten, leading to a chewier texture.
Shape your loaf
Once the dough has risen significantly and is bubbly, turn it out onto a floured surface. Gently deflate the dough and shape it into a loaf or a round shape, depending on your preference. Try to create surface tension by tucking the edges underneath to form a nice tight shape.
Personal favorite? I love the rustic look of a free-form round loaf; it always feels homemade and cozy.
Preheat your oven and prepare for baking
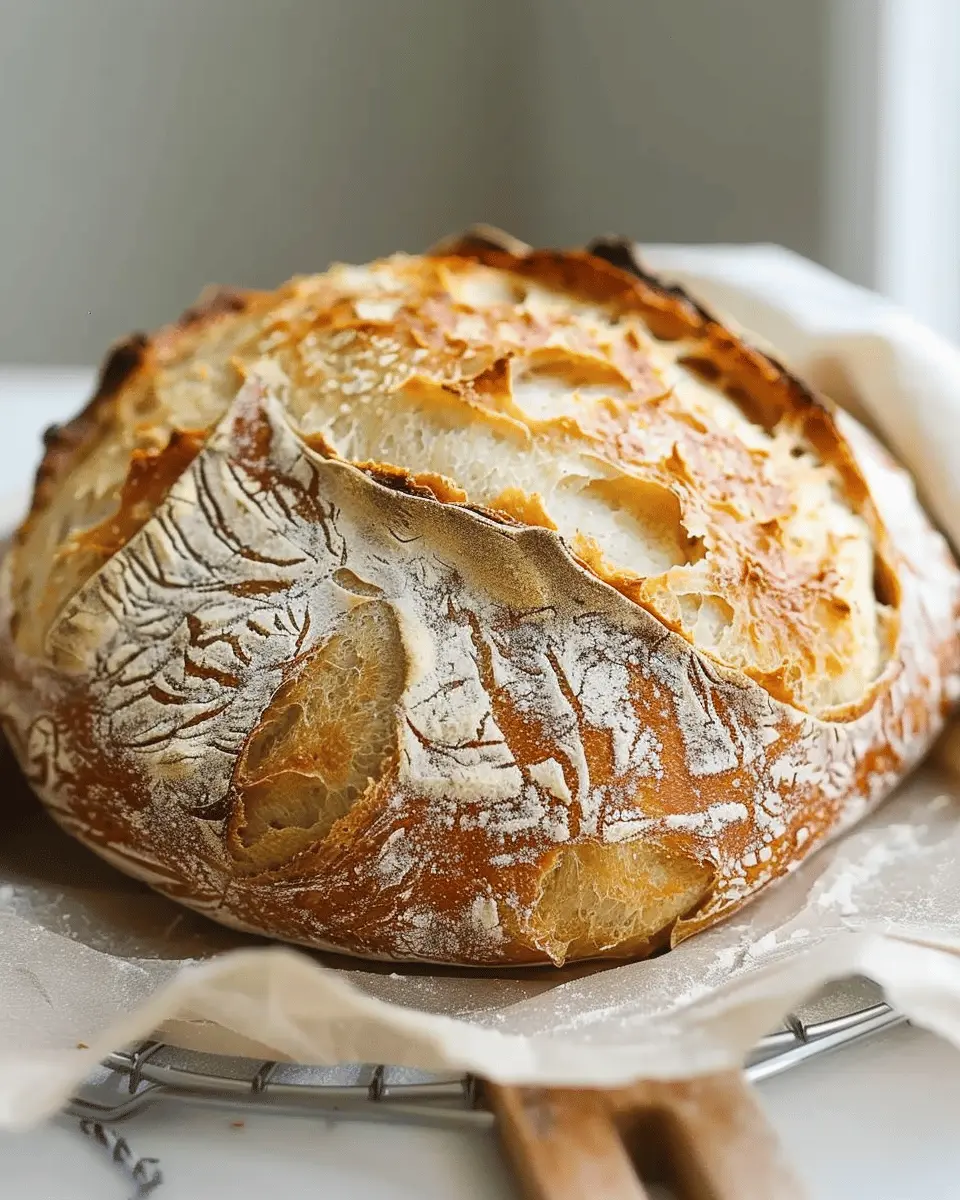
While your shaped loaf rests for a bit (about 30 minutes), preheat your oven to 450°F (232°C). Place a Dutch oven inside to heat up as well—this will help create steam, which is essential for achieving that crispy crust we all adore.
If you’re curious about the best tools for baking, check out the must-have kitchen equipment for bread enthusiasts.
Bake to perfection
Now, for the best part! Carefully remove the hot Dutch oven and place your dough inside, covering it with the lid. Bake for 30 minutes, then remove the lid and bake for an additional 15 minutes to achieve that golden-brown crust.
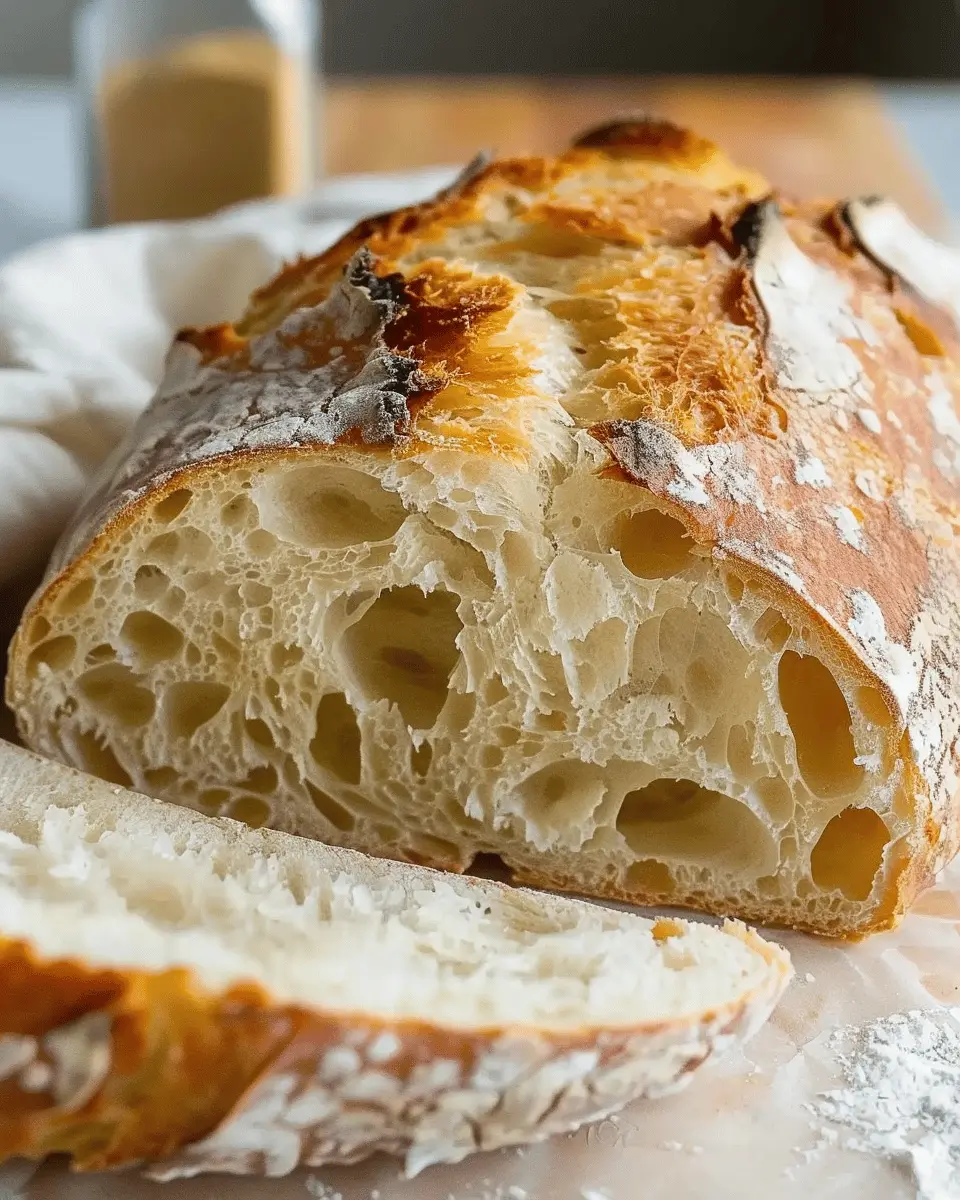
Remember, patience is key here; let the bread cool completely before slicing. Cutting into warm bread can lead to a gummy crumb—a disappointment you’ll want to avoid!
By following these steps, you’ll have a beautiful, homemade artisan bread that’s perfect for sandwiches, brunches, or simply slathering with your favorite butter. Enjoy the process and, of course, the delicious results!
Variations of Artisan Bread
Adding Herbs and Spices for Flavor
Elevating your artisan bread recipe can be as simple as introducing herbs and spices. Imagine biting into a loaf infused with rosemary, thyme, or even a hint of crushed garlic! Fresh herbs can add a delightful aroma and unique flavor profile. For a Mediterranean twist, consider incorporating dried oregano or basil. If you fancy a bit of heat, a sprinkle of red pepper flakes can do wonders. This creative approach not only enhances taste but also makes your bread a focal point at any meal.
Exploring Different Flours
Using different flours can dramatically transform your artisan bread recipe. While all-purpose flour is a go-to, experimenting with alternatives like whole wheat, spelt, or rye can offer various textures and flavors. For example, whole wheat flour adds a nuttiness and heartiness, while rye brings a unique tang. You might also explore gluten-free flours like almond or chickpea for those with dietary restrictions. Each flour type contributes distinct characteristics, enabling you to craft a loaf that’s uniquely yours. For more details on flour types, check out resources from the Whole Grains Council.
Incorporating Cheese and Olives for a Gourmet Touch
Who doesn’t love the indulgence of cheese and olives in bread? Adding shredded cheese like sharp cheddar or creamy feta takes your artisan bread recipe from simple to spectacular. Likewise, diced olives can introduce a briny flavor that pairs perfectly with savory dishes. As you mix in these gourmet elements, consider the balance of flavors; a little goes a long way! Such ingredients not only enhance taste but also give your loaf a rustic, appealing appearance.
By making these variations, you can create artisan bread that reflects your personal taste and impresses family and friends. Happy baking!
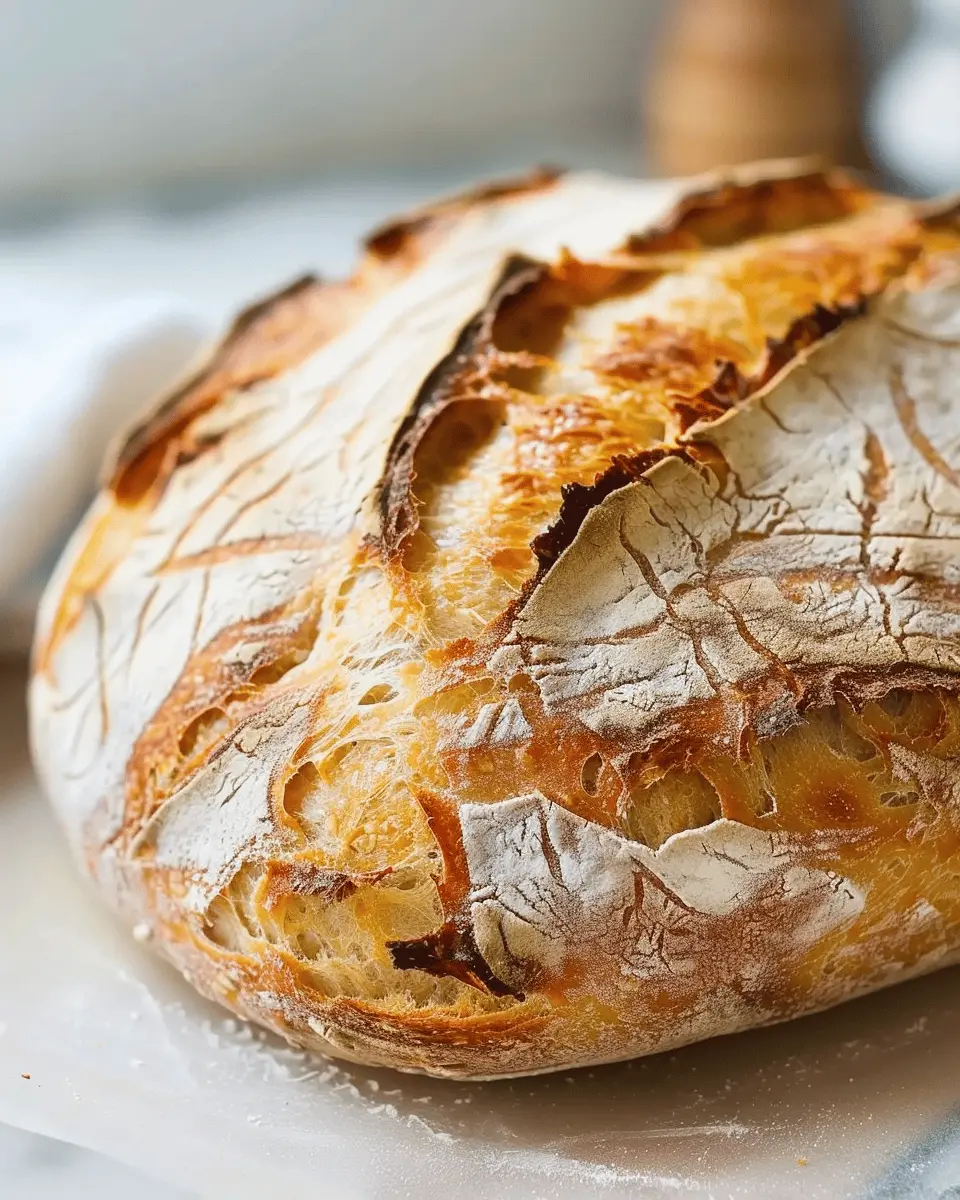
Cooking Tips and Notes for Artisan Bread
Key Tips for Achieving the Best Crust
Getting that perfect crust on your artisan bread is all about technique. Here are some of my fail-proof tips:
-
Preheat Your Oven: Ensure your oven is properly preheated to the required temperature. A hot oven helps create a lovely crust.
-
Use a Dutch Oven: Baking your bread inside a covered Dutch oven traps heat, mimicking a professional steam oven and giving you a fantastic crust.
-
Score Your Dough: Making a few shallow cuts on the surface allows the bread to expand and breathe, creating a beautiful texture.
Importance of Steam in Baking
Don’t underestimate the power of steam! When you add moisture to your oven during the first few minutes of baking, it helps develop that crispy crust we all love. Steam also allows the dough to rise before the crust forms.
For more tips on creating professional-quality bread at home, check out the article on The Kitchn about steam in baking. Trust me, your artisan bread recipe will thank you!
Serving Suggestions for Artisan Bread
Simple pairings for enjoying your bread
One of the beauties of an artisan bread recipe is its versatility. You can keep it simple and enjoy a warm slice slathered with butter or a drizzle of olive oil. Here are a few uncomplicated pairings that work splendidly:
- Cheese: Aged cheeses like cheddar or gouda enhance the bread’s crusty texture.
- Condiments: Try hummus or a vibrant tapenade for a burst of flavor.
- Veggies: Fresh tomatoes and basil create a refreshing bruschetta.
You can learn more about different cheeses that pair well with bread from great resources like Cheese.com.
Creative ideas for serving with meals
Think outside the box when serving your loaf! Slice it up for sandwiches, using fillings like turkey bacon with avocado for a trendy twist. Alternatively, toast thicker slices and top them with a poached egg and fresh arugula for a satisfying brunch staple.
Serve beside hearty soups or stews to soak up those delicious flavors. Don’t hesitate to explore unique spreads like garlic-infused butters or spicy spreads to take your artisan experience to the next level!
Remember, your artisan bread can do more than accompany a meal; it can be the star on your dining table!
Time Breakdown for Artisan Bread
When diving into this wonderful artisan bread recipe, it’s essential to know how much time you’ll need to dedicate. Here’s a helpful breakdown to keep you organized and excited:
Preparation Time
The initial mixing and kneading will take about 20-30 minutes. This is the time to channel your inner baker—don’t rush!
Rising Time
Once your dough is prepared, it needs some love. Allow for approximately 1 to 2 hours for the first rise. It’s during this time that the magic happens as the dough transforms. A longer rise can enhance flavors, so feel free to experiment!
Baking Time
Finally, the best part! Baking the artisan bread will take about 30-40 minutes. This is when your kitchen fills with that irresistible aroma.
Total Time
In total, you’re looking at roughly 2 to 3 hours. But remember, much of this time is for rising—allowing you to tackle other tasks while you wait for your culinary creation.
By keeping this timeline in mind, you’re well on your way to mastering the art of artisan bread, and your friends may even start asking for their own loaves! For more tips on bread-making, check out resources from King Arthur Baking to elevate your skills and knowledge.
Nutritional Facts for Artisan Bread
When diving into the world of homemade artisan bread, it’s not just about taste but nutrition too! Here’s a quick breakdown:
Caloric Content
A single slice of homemade artisan bread generally contains around 80-90 calories. The exact number can vary based on the ingredients and portion size, so you’re in control of what goes into your loaf.
Macronutrient Breakdown
Typically, you’ll find:
- Carbohydrates: About 15-20g per slice, mainly from whole grains if you choose them.
- Proteins: Roughly 3g, providing essential amino acids.
- Fats: Generally low, around 1g, especially if you skip oil or butter in the recipe.
Health Benefits of Homemade Bread
Crafting your own artisan bread means you can avoid preservatives and add whole, nutritious ingredients. Research indicates that homemade bread can improve digestion, thanks to fermenting processes that enhance nutrient absorption (source: Healthline).
Making your own not only saves money but also offers the joy of creating something healthy and delicious! Plus, with an artisan bread recipe, you can customize flavors and ingredients to suit your own personal taste. Who doesn’t love a warm, fresh slice from their own kitchen?
FAQs About Artisan Bread
What if my dough doesn’t rise?
If you find that your dough isn’t rising, it can be quite frustrating. First, check the expiration date on your yeast. Using fresh ingredients is vital; inactive yeast won’t do you any favors. Another possibility is the temperature of your environment — dough thrives in warm, draft-free spaces. A good trick is to preheat your oven for a minute or two, then turn it off and place your dough inside to rise. If you’re new to baking or want to dive deeper, this guide on bread baking is a great resource!
Can I use whole wheat flour?
Absolutely! Substituting whole wheat flour adds a wonderful nutty flavor and boosts the nutritional value of your artisan bread recipe. However, keep in mind that whole wheat flour absorbs more liquid. Adjust the hydration by adding a bit more water to achieve that perfect dough consistency.
How do I store leftover artisan bread?
To maximize freshness, store your leftover artisan bread in a paper bag at room temperature for a day or two. If you want to keep it longer, wrap it tightly in plastic wrap and freeze. When you’re ready to eat it, thaw it at room temperature and reheat in the oven for that freshly baked taste.
Tips for refreshing stale bread
Stale bread doesn’t have to end up in the trash. You can resurrect it with a few simple tips:
- Moisten: Lightly spritz or run the bread under water, then pop it in a preheated oven at 350°F for about 10 minutes.
- Slice & Toast: Thin slices can be transformed into delightful crostini or simply toasted with some butter.
- Bread Pudding: Turn your stale bread into a sweet or savory bread pudding. It’s a fantastic way to repurpose those remnants!
For more insights, check out this helpful article on bread storage techniques to keep your loaves at their best.
Conclusion on Artisan Bread Recipe
Final thoughts on embracing homemade bread
Making your own artisan bread is not just about nourishment; it’s a delightful journey of flavors and textures. As you get familiar with the artisan bread recipe, you’ll discover the satisfaction of crafting something truly special from scratch.
Imagine the smell of freshly baked bread filling your home, transforming it into a cozy haven. Plus, it’s a fantastic way to bond with friends or impress family during gatherings. You’ll save money and control your ingredients, ensuring a healthier loaf.
So roll up your sleeves, and don’t hesitate to experiment! The world of homemade bread awaits—are you ready to dove into this delicious adventure? For more inspiration, check out King Arthur Baking or explore techniques on The Bread Pudding.
PrintArtisan Bread Recipe: Easy Steps for Homemade Delights
Learn how to make delicious artisan bread at home with this easy recipe!
- Prep Time: 15 minutes
- Cook Time: 35 minutes
- Total Time: 2 hours 50 minutes
- Yield: 1 loaf 1x
- Category: Bread
- Method: Baking
- Cuisine: American
- Diet: Vegetarian
Ingredients
- 3 cups all-purpose flour
- 1 1/2 cups warm water
- 1 packet active dry yeast
- 1 tablespoon salt
Instructions
- In a large bowl, combine warm water and yeast. Let it sit for 5 minutes until frothy.
- Stir in flour and salt until a sticky dough forms.
- Cover with a towel and let rise for 1-2 hours until doubled in size.
- Preheat your oven to 450°F (230°C).
- Turn dough onto a floured surface and shape it into a ball.
- Place on a baking sheet and let it rest for 30 minutes.
- Bake for 30-35 minutes until golden brown.
Notes
- Allow the bread to cool before slicing for better texture.
- Experiment with different herbs or cheeses in the dough for added flavor.
Nutrition
- Serving Size: 1 slice
- Calories: 120
- Sugar: 0.5g
- Sodium: 300mg
- Fat: 1g
- Saturated Fat: 0g
- Unsaturated Fat: 0g
- Trans Fat: 0g
- Carbohydrates: 24g
- Fiber: 1g
- Protein: 4g
- Cholesterol: 0mg
Keywords: artisan bread, homemade bread, baking bread