Introduction to No-Oven Turkish Bread
Making homemade bread can feel like a daunting task, but trust me, it’s one of the most rewarding and delicious activities you can embark on! The aroma of freshly baked bread wafting through your home is a scent that brings back memories of family dinners and cozy gatherings. But why opt for no-oven Turkish bread? One word: convenience. Not everyone has access to an oven, and let’s face it, who wants to spend hours waiting for dough to rise in the heat of a kitchen?
Why Make Homemade Bread?
Homemade bread allows you to control each ingredient, ensuring a fresher product tailored to your tastes. With the rise of conscious eating, making your bread from scratch means using high-quality flours, removing unwanted preservatives, and enjoying the satisfaction of knowing exactly what’s in your food.
Here are some compelling reasons to roll up your sleeves and dive into no-oven bread-making:
- Cost-Effective: Store-bought bread can add up, especially if you favor artisan loaves. Making your own is more budget-friendly!
- Customizable: Whether you prefer adding herbs, spices, or even a twist like Turkey Bacon or Chicken Ham, the possibilities are endless!
- Skill Development: Bread-making encourages you to experiment, learn, and refine your cooking skills. Plus, it’s a delightful activity you can share with friends.
For a deeper dive into the benefits of homemade bread, check out this informative article from The Bread Lab. You’ll discover how easy it is to embrace a new culinary adventure, especially in today’s world where baking has taken center stage on social media.
Now, about the no-oven Turkish bread itself—this method opens up a world of flaky, soft goodness without the fuss of traditional baking. Imagine indulging in warm, flatbread alongside your favorite dishes without the need for an oven! Stay tuned for the full recipe and tips to create a delightful addition to your meals. Your kitchen is about to become a bread-making haven!
Ingredients for No-Oven Turkish Bread
Making no-oven Turkish bread is simpler than you might think! Here’s what you’ll need for this delicious, soft bread that’s perfect for dips or as a side to your favorite dishes.
Essential Ingredients
- 2 cups all-purpose flour: This is your main ingredient and provides structure.
- 1 cup Greek yogurt: It adds moisture and a slight tang.
- 1 tablespoon baking powder: This helps the bread rise beautifully.
- 1/2 teaspoon salt: Enhances the flavors and balances the richness.
- 01/5 cup warm water: To adjust the dough’s consistency.
- Olive oil: Just a drizzle for cooking and achieving that lovely crisp outer layer.
- Fresh herbs (optional): Try adding dill or parsley for extra flavor—these can really elevate your no-oven Turkish bread!
This bread is super versatile! You can customize it with your favorite spices, or even some Turkey Bacon or Chicken Ham if you’re feeling adventurous. Don’t forget to check out this guide on herbs for more delicious ideas!
Why not gather your friends and make it a fun baking night? It’s a quick recipe that results in tasty delights everyone will love!
Preparing No-Oven Turkish Bread
Making no-oven Turkish bread is a delightful journey that brings the richness of traditional flavors right into your home kitchen, minus the need for an oven. Whether you’re a seasoned culinary explorer or a curious first-timer, this recipe is straightforward and rewarding. Let’s walk through the steps together, ensuring you have everything needed to create delicious bread that will impress your friends and family.
Gather Your Ingredients
Before you get started, it’s essential to have all your ingredients ready. Here’s what you’ll need for your no-oven Turkish bread:
- 2 cups all-purpose flour
- 1 teaspoon salt
- 1 teaspoon sugar
- 1 tablespoon baking powder
- 1 cup yogurt (natural, plain)
- 3 tablespoons olive oil
- Optional: herbs (like thyme or oregano) for added flavor
Make sure to measure accurately to ensure perfect results. Fresh ingredients are always best, so if possible, use yogurt that hasn’t been sitting in the fridge for too long. This can truly elevate the taste!
Mix the Dry Ingredients
In a mixing bowl, start by combining the dry ingredients. This means carefully adding together your all-purpose flour, salt, sugar, and baking powder. Mixing these dry ingredients thoroughly ensures that the flavors and leavening agents are evenly distributed, leading to a fluffier bread. Use a whisk or a fork to make this process even easier.
Combine Wet Ingredients
In a separate bowl, mix your wet ingredients: the yogurt and olive oil. You want to create a smooth, blended mixture that will be added to your dry ingredients. Think of how creamy the yogurt can be, enhancing both the flavor and texture of your bread. This creamy consistency is what makes this bread recipe so unique—it’s all in the balance!
Knead the Dough
Once your wet ingredients are ready, gradually add them to the dry mixture. Use your hands or a spatula to bring it together until you form a rough dough. Now comes the fun part: kneading! Lightly flour a clean surface and knead the dough for about 5-10 minutes. You’re aiming for a soft, elastic texture that feels smooth and a little warm to the touch. If you feel it’s too sticky, don’t hesitate to add just a little more flour.
Let It Rise
After kneading, place your dough in a lightly oiled bowl and cover it with a damp cloth. Here’s where the magic happens—let the dough rise for about 30 minutes in a warm spot. This step is crucial; it allows the flavors to deepen and results in a final product that’s light and airy.
Shape the Dough
After letting your dough rise, it’s time to get creative! Divide the dough into 4 equal pieces. Roll each piece into a ball and then flatten it with your palm to create a disk about half an inch thick. You can also use a rolling pin if you prefer a more uniform shape. This shaping process helps create that appealing crust we all love.
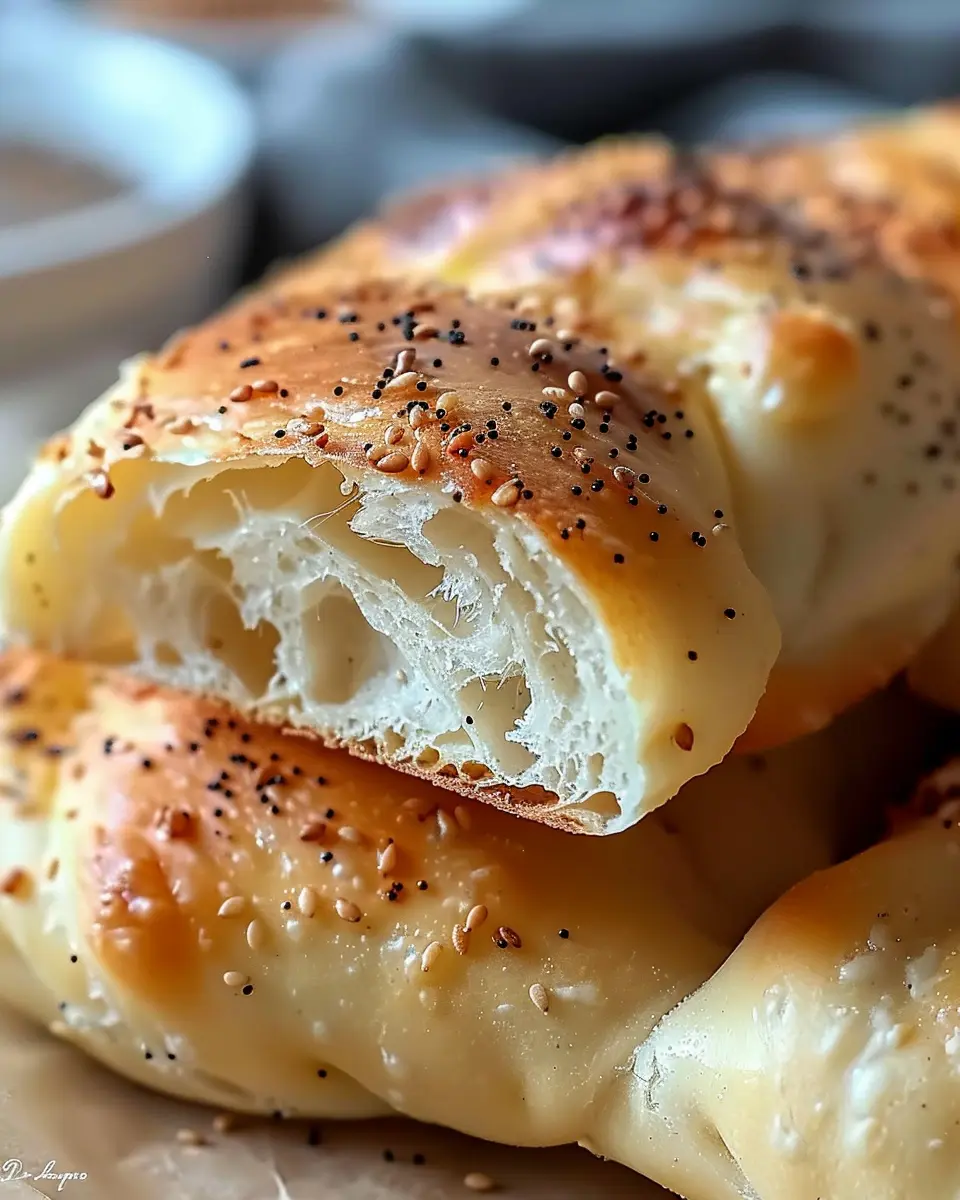
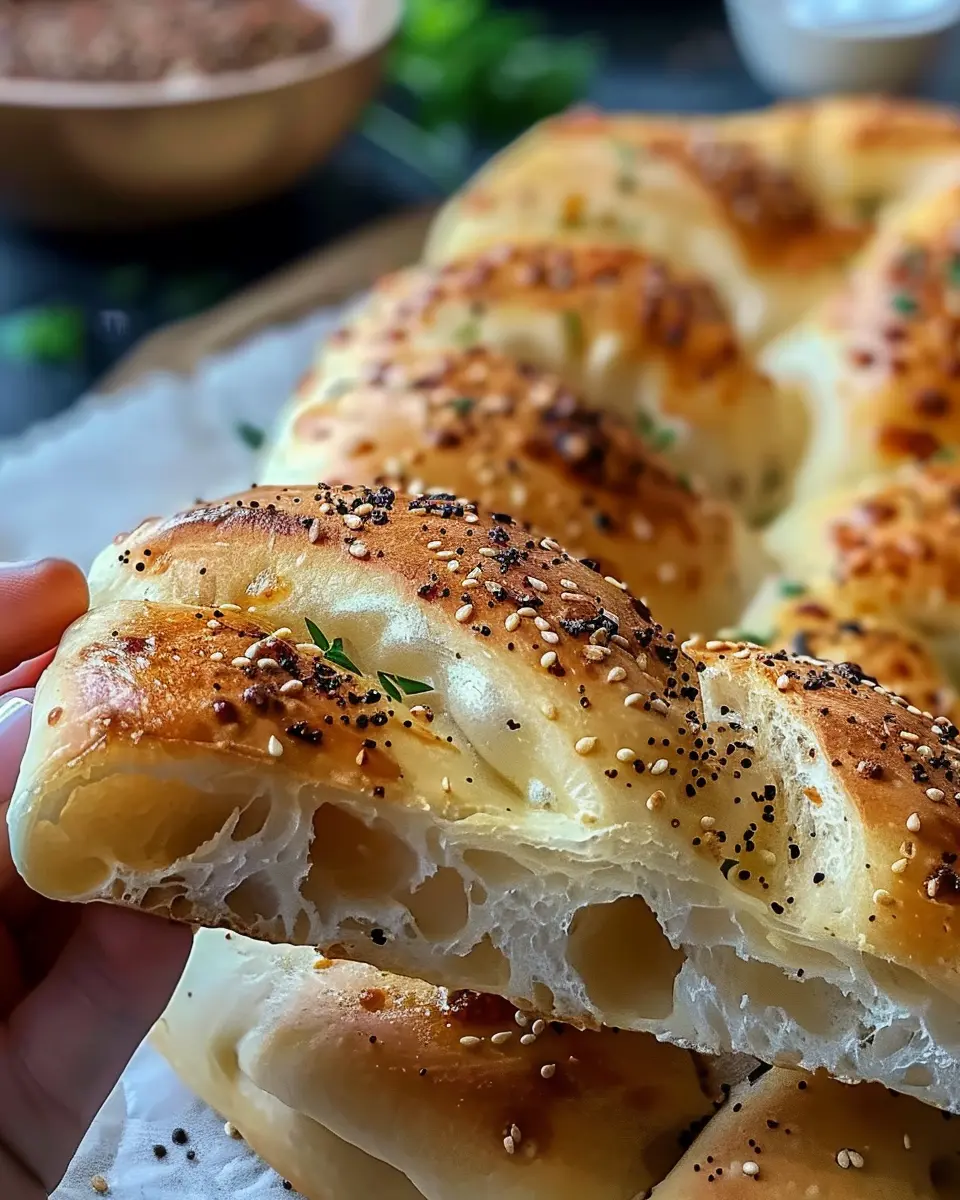
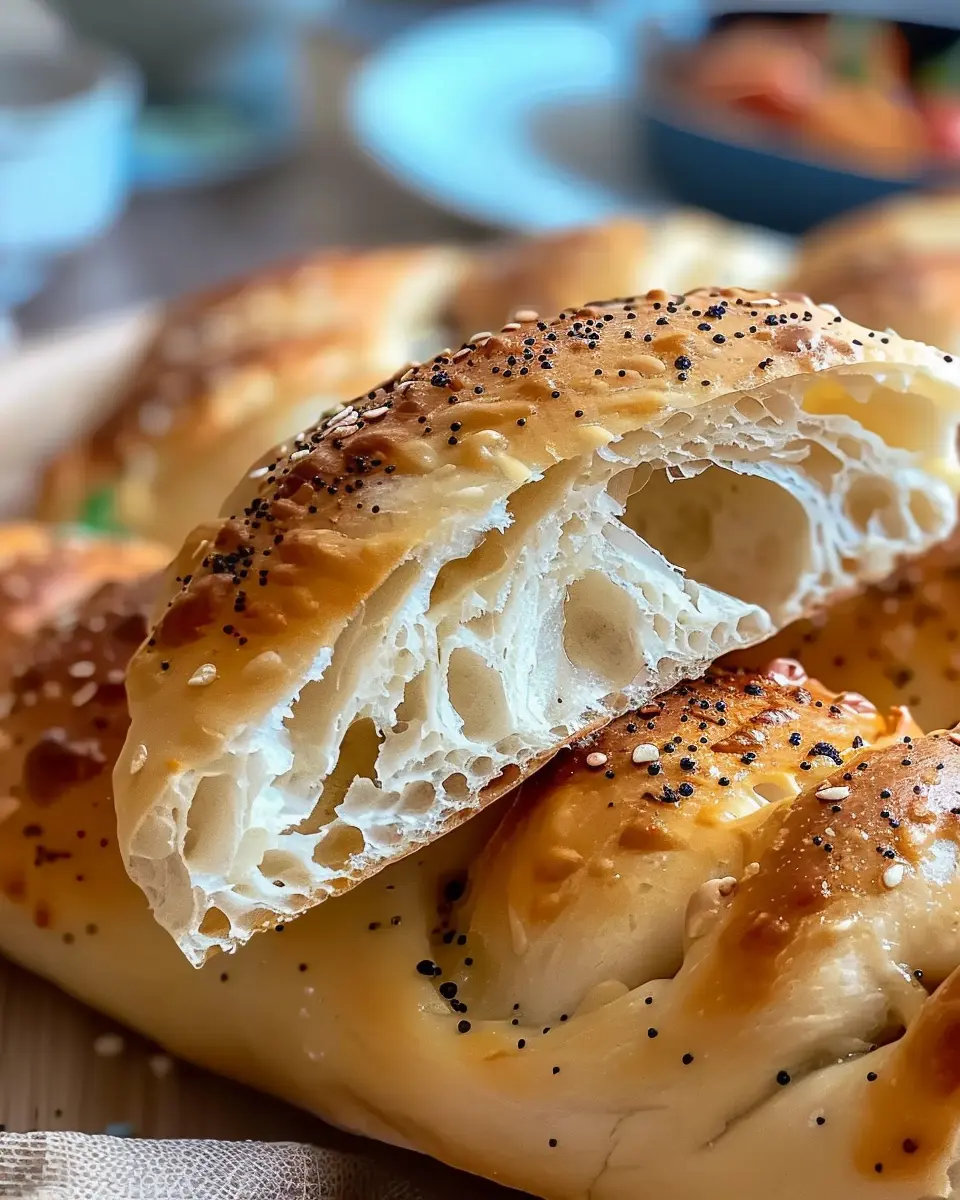
Cook in a Skillet
Now, grab a non-stick skillet and preheat it over medium heat. Add a little olive oil to the skillet for flavor and to prevent sticking. Once hot, place your dough disks in the skillet. Cook for about 3-4 minutes on each side, pressing down lightly with a spatula. You’ll know they’re done when they look golden brown, and a gentle tap sounds hollow. Cooking in a skillet not only gives them a delightful texture but also offers a unique, smoky flavor.
Add Toppings
The final step in making your no-oven Turkish bread is enhancing them with toppings. You can keep it simple with a sprinkle of salt and olive oil or get creative with your favorite goodies like Turkey Bacon, Chicken Ham, or fresh herbs. Some even love to pair their bread with hummus or dips as a fantastic appetizer.
Making no-oven Turkish bread is not just about creating delicious food; it’s about enjoying the experience along the way. So, gather your ingredients, roll up your sleeves, and let’s get cooking! If you’d like to explore more about Turkish cuisine, check out BBC Good Food for additional recipes and inspiration.

Variations on No-Oven Turkish Bread
When it comes to no-oven Turkish bread, the creative possibilities are endless, allowing you to craft variations that suit any occasion. Whether you’re enjoying a cozy night in or entertaining guests, these variations add a delightful twist to the classic recipe.
Herbed Turkish Bread
Imagine the scent of fresh herbs wafting through your kitchen! To elevate your no-oven Turkish bread, consider incorporating an array of herbs. Fresh rosemary, thyme, or parsley can add a burst of flavor. Simply mix chopped herbs into your dough for a fragrant twist. You might even sprinkle some atop the dough before cooking. This version pairs beautifully with enjoyed dips such as hummus or tzatziki for an impressive appetizer.
Cheese-Stuffed Turkish Bread
If you’re a cheese lover, this variation will become your new favorite! Filling your no-oven Turkish bread with melted cheese makes for a gooey, satisfying treat. Popular choices include feta, mozzarella, or even a blend of your favorites. Roll out your dough, place a generous amount of cheese in the center, and fold it over. Cook until golden brown and gooey. Trust me, your taste buds will thank you!
Sweet Variations with Honey or Jam
Looking to satisfy your sweet tooth? Transform your no-oven Turkish bread into a delectable treat by drizzling it with honey or spreading your favorite jam on top. You can even add a sprinkle of cinnamon or a dash of powdered sugar for an extra touch of sweetness. This makes for an excellent breakfast or a comforting evening snack.
No matter which variation you choose, you’ll find that experimenting with no-oven Turkish bread is not just delicious but also a fun way to bring creativity into your kitchen. Explore more about Turkish bread recipes here or check out other innovative bread-making techniques here. Happy baking!
Cooking Tips and Notes for No-Oven Turkish Bread
Flour Choices
When making no-oven Turkish bread, choosing the right flour is key. You can opt for all-purpose flour for a soft texture, or try whole wheat for a nuttier flavor and added nutritional benefits. If you want something gluten-free, consider a blend of almond flour and rice flour. Just remember, the type of flour will affect the dough’s consistency, so adjust your water accordingly based on the flour choice.
Storing Leftovers
Once you’ve devoured your no-oven Turkish bread, store any leftovers in an airtight container at room temperature. This method will keep the bread soft for a couple of days. If you notice it starts to feel a little dry, reheating it on a skillet for a minute will restore its deliciousness!
Freezing Dough
Want to save time for your next craving? You can freeze the dough before cooking! Simply shape it into disks and wrap them tightly in plastic wrap. When you’re ready to enjoy, thaw in the fridge overnight and cook as usual. This method maintains the flavor and texture beautifully.
For further tips, check out this resource on bread storage techniques. Happy cooking!
Serving suggestions for No-Oven Turkish Bread
Best dips and spreads
When it comes to no-oven Turkish bread, dips and spreads are where the magic happens! Hummus, classic or flavored, is a must-try. The creamy texture complements the bread beautifully. For something zesty, whip up a yogurt-based dip with fresh herbs like dill or mint. Add some garlic for extra kick! You can also enjoy this bread with a good-quality olive oil, sprinkled with a dash of sea salt for a simple yet delightful treat.
Pairings with meals
No-oven Turkish bread pairs wonderfully with various meals. Think spicy dishes like chili or a warm lentil soup; the bread acts as a perfect vessel for scooping. For a Mediterranean twist, try it with grilled chicken or skewers, bringing together flavors that’ll make your taste buds dance.
Creative uses
Let’s get creative! Use your no-oven Turkish bread as a base for wraps, adding turkey bacon, roasted veggies, or even chicken ham. The flexibility of this bread means you can craft sandwiches that suit your taste, like a fresh veggie slam or a hearty protein-packed meal. Feel free to experiment with different fillings, and don’t shy away from turning it into a breakfast wrap with scrambled eggs and cheese!
For more ideas on how to enjoy this bread, check out BBC Good Food’s guide for inspiring pairings and recipes!
Time breakdown for No-Oven Turkish Bread
When you’re eager to whip up a delicious batch of no-oven Turkish bread, understanding the timing can make all the difference. Let’s break it down.
Preparation time
You’ll need approximately 20 minutes to gather your ingredients, mix the dough, and allow it to rest. This stage is key for developing flavor, so don’t rush it!
Cooking time
Cooking your no-oven Turkish bread will take about 15 minutes per batch. If you’re making multiple rounds, keep your skillet hot and ready!
Total time
In total, you’re looking at around 35-40 minutes from start to finish. Trust me, it’s a small investment for that warm, homemade goodness you’ll get to enjoy!
For some excellent kitchen tips, check out Serious Eats for additional insights on bread-making techniques!
Nutritional facts for No-Oven Turkish Bread
Calories per serving
Each serving of no-oven Turkish bread contains approximately 120 calories, making it a guilt-free addition to your meals. Perfect as a snack or part of a main dish, it fits seamlessly into a balanced diet.
Key nutrients
You’ll find this delightful bread is packed with essential nutrients, including:
- Carbohydrates: Ideal for energy
- Protein: Helps build and repair tissues
- Fiber: Aids in digestion
- Vitamins and minerals: Such as B vitamins and iron
Health benefits
The combination of wholesome ingredients contributes to various health benefits. The high fiber content can support digestive health, while the B vitamins found in no-oven Turkish bread help boost energy levels. Choosing whole grain options can further enhance its nutritional profile.
Incorporating this bread into your meals offers a delicious way to enjoy food that supports your wellness journey. Want to learn more about whole grains? Check out this resource on nutrition.
FAQs about No-Oven Turkish Bread
Can I use whole wheat flour instead?
Absolutely! Whole wheat flour can be a nutritious substitute for all-purpose flour in your no-oven Turkish bread. Just keep in mind that it might yield a denser bread and change the flavor profile a bit. If you’re looking for that soft, fluffy texture, you might consider mixing in some all-purpose flour with the whole wheat. A blend of 50/50 is a great starting point, giving you the health benefits of whole wheat while retaining some of that classic fluffiness.
How do I know if the dough has risen enough?
It can be a bit tricky, right? But a simple rule of thumb is to look for the dough to double in size. If you poke it gently, it should spring back slowly but not entirely. This indicates that the yeast is active and the air bubbles have formed well. Just like with any baked good, patience is key—don’t rush it!
What if I don’t have a skillet?
No worries at all! If you don’t have a skillet, you can take advantage of a heavy-bottom pot or even a non-stick frying pan. The goal is having a nice, even heat distribution. If you happen to have a grill pan, that works wonders too. You’ll want to keep the heat moderate, ensuring that the no-oven Turkish bread cooks through without burning on the outside.
Curious to know more about different cooking methods? Check out resources like the Food Network for additional insights. Enjoy your baking adventure, and don’t hesitate to get creative!
Conclusion on No-Oven Turkish Bread
In summary, no-oven Turkish bread offers a delightful way to enjoy fresh, homemade flavors without the fuss of baking in a traditional oven. Whether you’re enjoying it with a spread of hummus or using it to wrap your favorite grilled Turkey Bacon or Chicken Ham, this bread is versatile and satisfying.
Preparing it on the stovetop makes it an accessible option for anyone, regardless of kitchen setup. Plus, it’s an excellent opportunity to experiment with various toppings and seasonings. For more inspiration, check out resources on traditional Middle Eastern breads or cooking techniques, such as Serious Eats. Why not invite friends over for a weekend cook-off to see who can create the best no-oven delights? Happy cooking!
PrintNo-Oven Turkish Bread: Easy Recipe for Fresh Homemade Delight

A simple recipe for making delicious Turkish bread without an oven, perfect for any meal.
- Prep Time: 15 minutes
- Cook Time: 10 minutes
- Total Time: 25 minutes
- Yield: 4 servings 1x
- Category: Bread
- Method: stovetop
- Cuisine: Turkish
- Diet: vegetarian
Ingredients
- 3 cups all-purpose flour
- 1 teaspoon salt
- 1 tablespoon sugar
- 1 tablespoon active dry yeast
- 1 cup warm water
- 2 tablespoons olive oil
Instructions
- In a bowl, combine warm water and sugar. Stir in the yeast and let it sit until frothy.
- In a separate bowl, mix flour and salt.
- Once the yeast mixture is frothy, add it to the flour mixture along with olive oil.
- Knead until a soft dough forms and let it rise for 1 hour.
- Shape the dough into a round flatbread and cook on a skillet for 4-5 minutes on each side until golden.
Notes
- Ensure your water is not too hot, or it may kill the yeast.
- Add herbs or spices to the dough for extra flavor.
Nutrition
- Serving Size: 1 piece
- Calories: 150
- Sugar: 1g
- Sodium: 200mg
- Fat: 4g
- Saturated Fat: 0.5g
- Unsaturated Fat: 3.5g
- Trans Fat: 0g
- Carbohydrates: 26g
- Fiber: 1g
- Protein: 4g
- Cholesterol: 0mg
Keywords: No-Oven Turkish Bread