Introduction to Artisan Bread
Baking your own bread might seem daunting, but diving into the world of artisan bread is not just rewarding; it’s a delightful journey. Imagine the fragrant aroma of freshly baked bread wafting through your home, creating a warm and inviting atmosphere. Not only does making your own bread allow you to control the ingredients, but it also brings a sense of accomplishment that’s hard to beat.
Why You Should Start Baking Your Own Bread
There are several reasons to consider putting on your apron and getting your hands doughy.
-
Healthier Alternatives: Store-bought bread often contains preservatives and additives. When you bake at home, you can use high-quality ingredients, avoiding harmful chemicals and making healthier choices. It puts you in control—how great is that?
-
Cost-Effectiveness: Over time, homemade bread is much cheaper than frequent purchases from the bakery. With just a few basic ingredients like flour, water, yeast, and salt, you can whip up numerous loaves, saving valuable dollars!
-
Creativity: Baking bread isn’t just about following a recipe; it’s an art. Trying different flour types, adding herbs, or experimenting with shapes can bring a personal touch to your creations. Plus, you can customize it to fit your taste perfectly, making every loaf truly yours.
-
Mindfulness: Baking can be a form of meditation. The repetitive process of kneading and shaping bread provides a primal satisfaction, allowing your mind to drift away from the inevitable stressors of modern life.
In short, embarking on an artisan bread recipe not only yields delicious results but also allows for a therapeutic experience in the kitchen. For further insights into the benefits of home baking, check out articles from the Bread Alliance or similar culinary resources.
So, are you ready to roll up your sleeves and discover the joys of bread baking? Your kitchen is about to become a cozy haven filled with the warm scent of fresh artisan bread. Let’s get started!
Ingredients for Artisan Bread
Simple pantry staples
Making your own artisan bread is not just rewarding but also surprisingly simple! The key ingredients you’ll need are pantry staples that you might already have:
- Flour: All-purpose or bread flour works beautifully for that lovely structure.
- Water: Use warm water to activate the yeast effectively.
- Salt: A must for enhancing flavor and strengthening the dough.
- Yeast: Active dry or instant yeast will do the trick for that perfect rise.
These foundational ingredients are essential for any artisan bread recipe, creating a loaf that boasts a crispy crust and a soft, airy crumb.
Optional add-ins for flavor
Want to take your bread to the next level? Consider incorporating some optional add-ins for added flavor and texture, such as:
- Herbs and spices: Rosemary or garlic can infuse your bread with delightful aromas.
- Seeds or nuts: Chia seeds or walnuts add crunch and depth.
- Cheese: A sprinkle of feta or aged cheddar can add a savory twist.
Experimenting with these ingredients can elevate your artisan bread game. I often love to incorporate ingredients I have on hand, ensuring each loaf has its unique character—just like you! For more on flavor pairings, check out resources like King Arthur Baking for inspiration.
Step-by-step Preparation of Artisan Bread
If you’ve ever walked through a bakery and been enveloped by the warm, yeasty aroma of fresh bread, you know exactly what I mean when I say nothing compares to artisan bread. Making your own at home not only fills your kitchen with that incredible scent but also offers the satisfaction of creating something from scratch. So, let’s roll up our sleeves and dive into the step-by-step preparation of artisan bread!
Combine dry ingredients
First things first, gather your ingredients. You’ll need:
- 3 cups of all-purpose flour
- 1½ teaspoons of salt
- 1 teaspoon of instant yeast
In a large mixing bowl, combine the flour, salt, and instant yeast. Whisking these together is essential because it evenly distributes the yeast, contributing to a uniform rise. This simple act is the foundation for our artisan bread recipe, ensuring you’re on your way to a crunchy crust and delightful texture. If you’re interested in more baking tips, check out King Arthur Baking.
Mix in warm water
Next, it’s time to add water. Use about 1½ cups of warm water (around 100°F/37°C). Slowly pour the water into the flour mixture while stirring gently with a wooden spoon or spatula. Don’t stress about a few lumps; this dough is not meant to be perfectly smooth at this stage. Mix until all the flour is moistened, and you have a rough, shaggy dough.
What’s great about this part is that it’s forgiving! If you find the dough too dry, feel free to add a splash more water.
Allow the dough to rise
Now comes the exciting part—allowing the dough to rise. Cover the bowl with a clean kitchen towel or plastic wrap, and let it sit at room temperature for 12 to 18 hours. This long fermentation process is what gives artisan bread its rich flavor and wonderful texture.
If you’re like me, waiting can be the toughest part, but patience is key! During this time, you can catch up on your favorite shows or take a stroll. It’s a great opportunity to think about how you’ll enjoy your fresh artisan bread, maybe with a spread of avocado or even some turkey bacon on the side.
Shape the dough
After your dough has risen and doubled in size, it’s time to shape it. Dust your countertop lightly with flour and gently transfer the dough onto it. With floured hands, fold the dough over itself a couple of times to shape it into a ball. Be gentle—overworking the dough can deflate it.
Once shaped, let it rest for about 30 minutes, covered with the towel. This step helps to relax the gluten, making it easier to handle and shape later on.
Prepare for baking
While your dough is resting, preheat your oven to 450°F (232°C) and place your Dutch oven (or any heavy pot with a lid) inside to heat up. This step is crucial for achieving that perfect crust. While you wait, you can line a piece of parchment paper with flour—this will make transferring the dough easier later.
When your dough has rested, carefully flip it over onto the parchment paper.
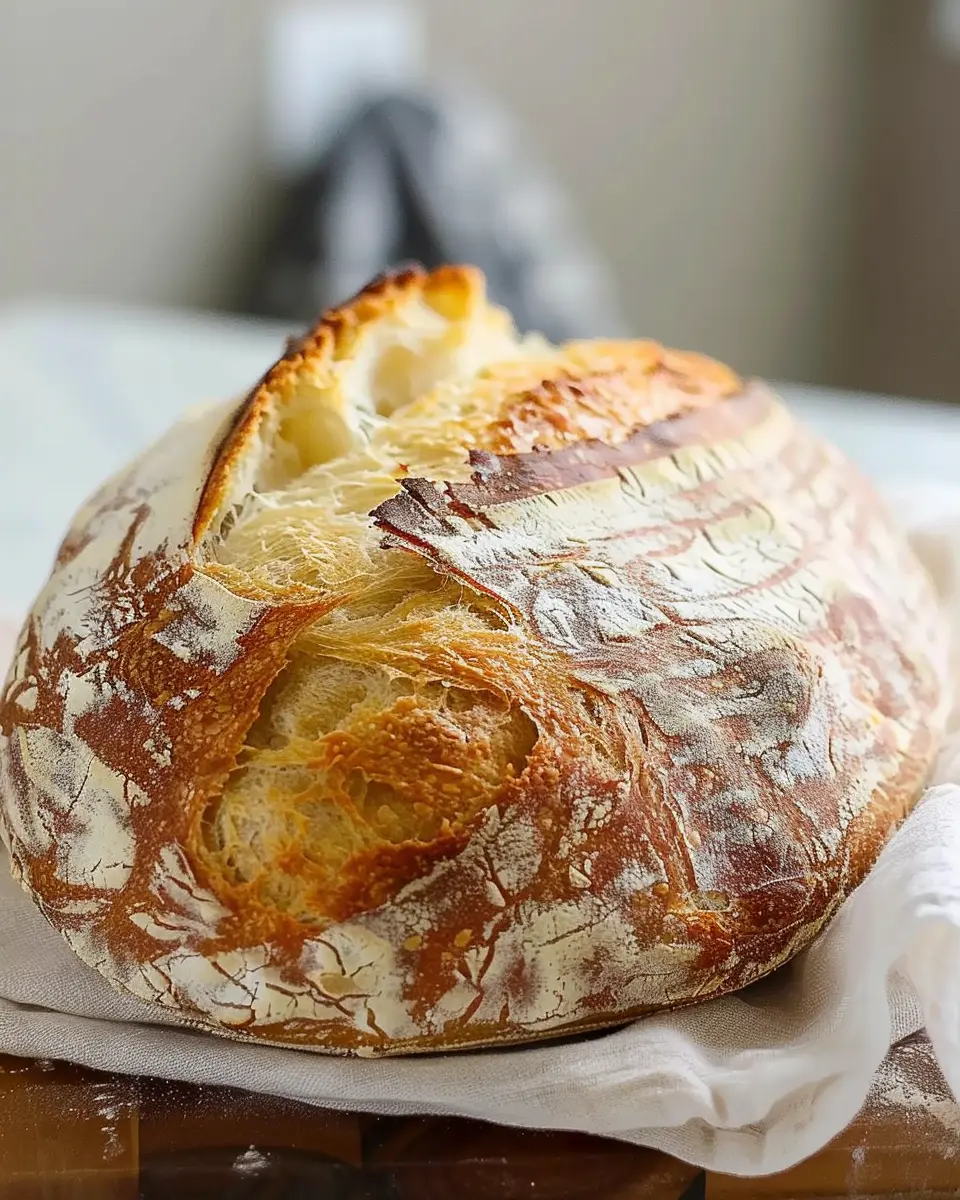
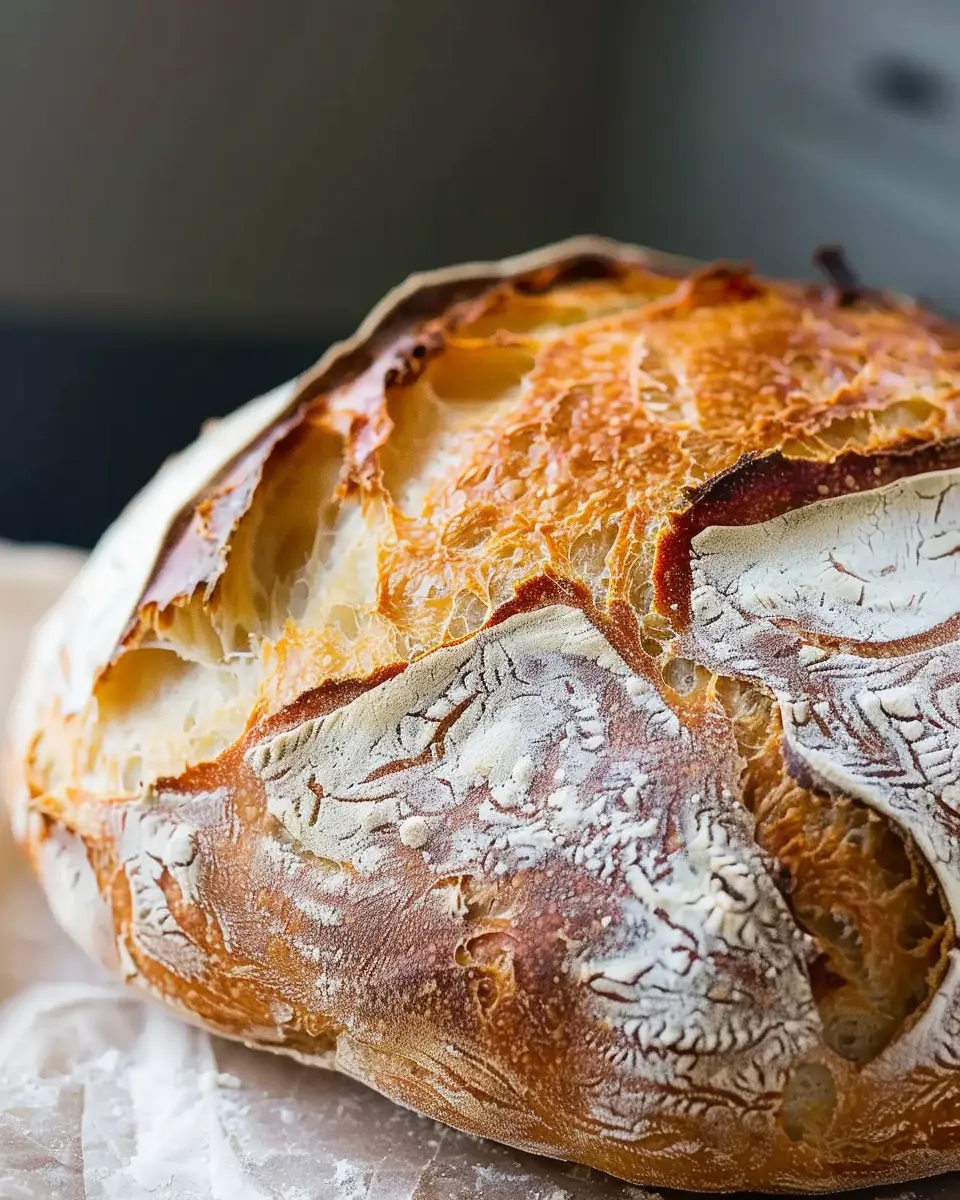
Bake for perfection
Finally, it’s time to bake! Carefully remove your hot pot from the oven and lift the parchment paper with the dough and place it inside. Cover with the lid and put it back in the oven.
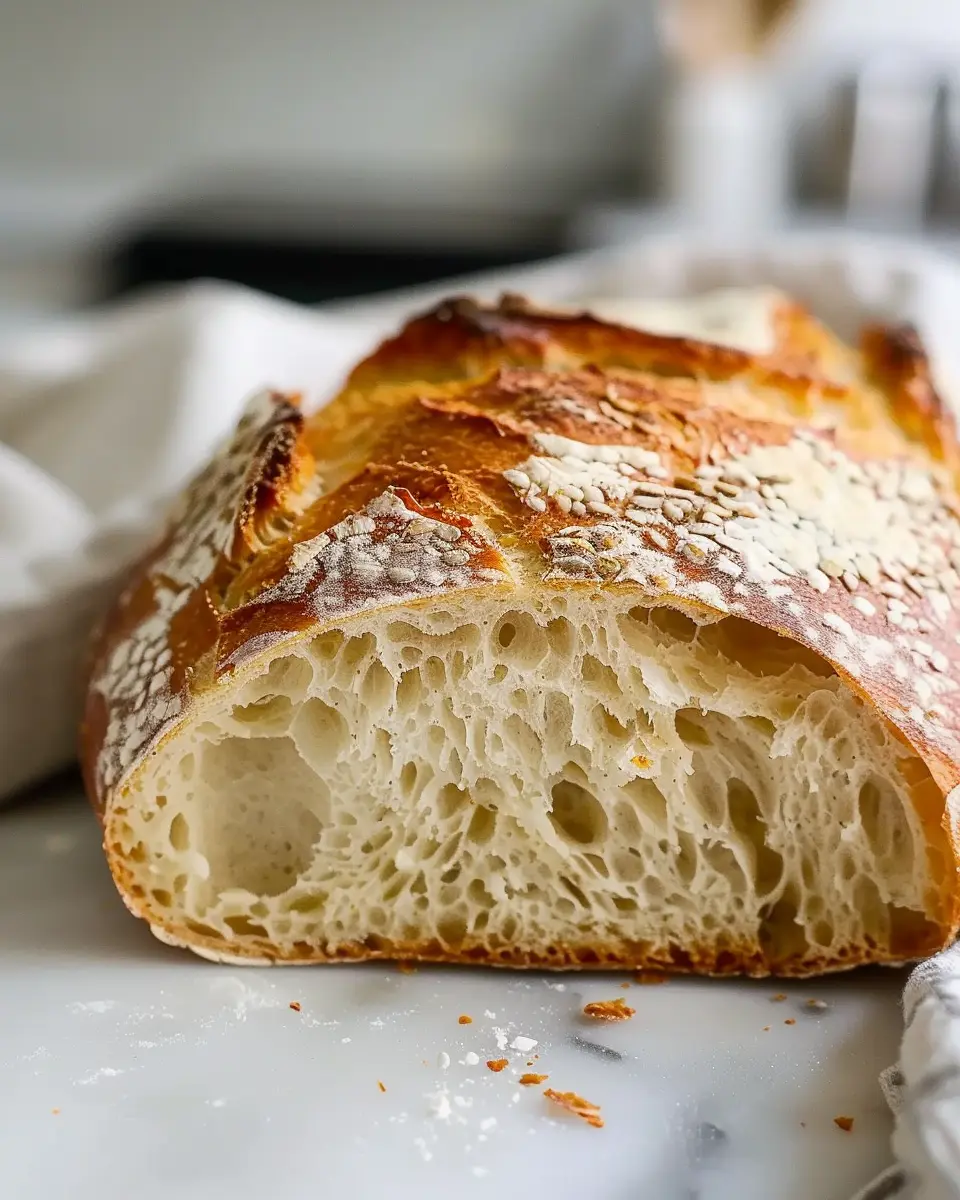
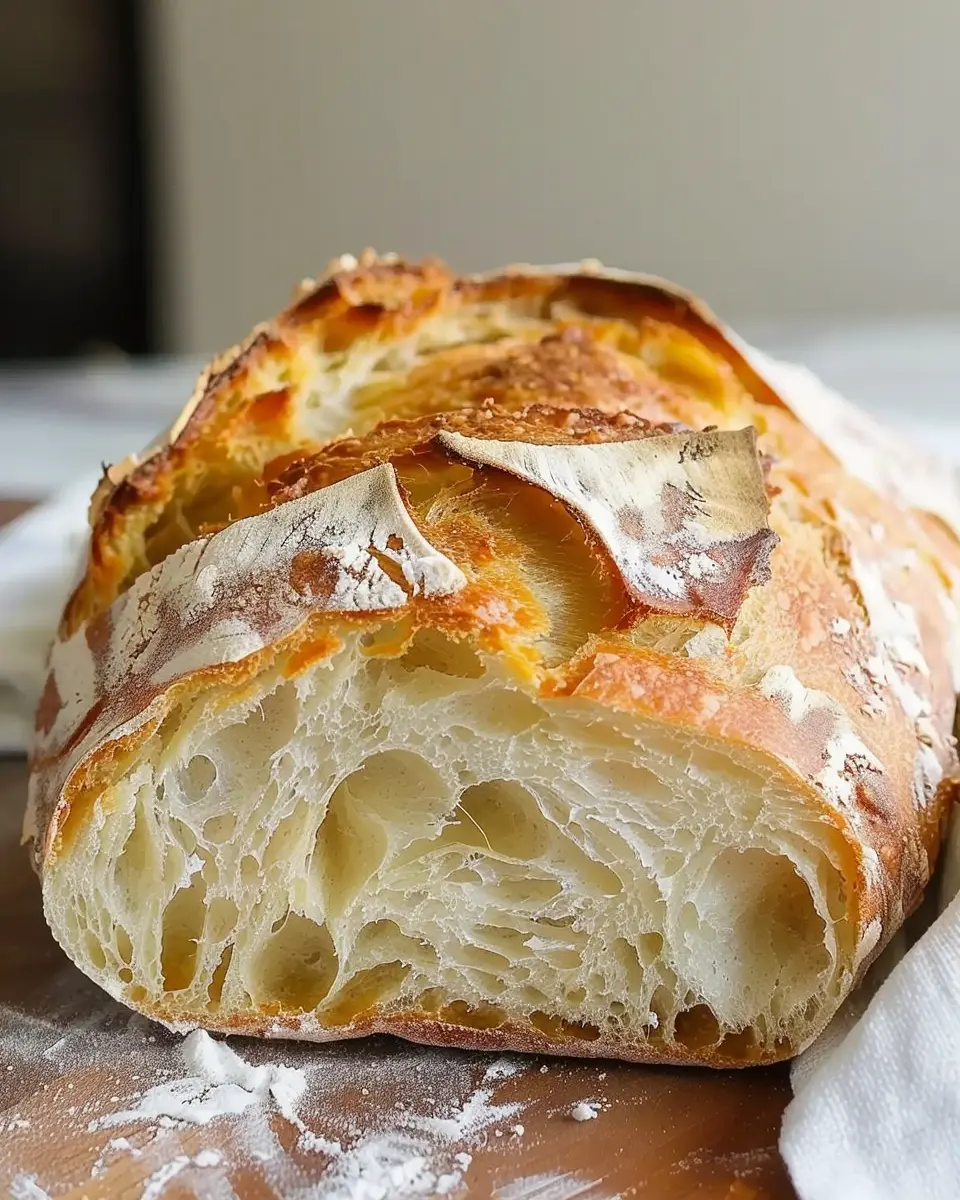
Bake for 30 minutes covered, then remove the lid and bake for an additional 15–20 minutes until it’s beautifully golden brown. You’ll know your artisan bread is done when it sounds hollow when tapped on the bottom.
Let the loaf cool before slicing, and voila! You have just created a beautiful centerpiece for any meal.
The joy of crafting your own artisan bread is unparalleled. From the initial mixing to the final bake, it’s an experience filled with tangible rewards. So, gather your ingredients, and happy baking!
Variations on Artisan Bread
Artisan bread is a beautiful canvas that invites creativity. From classic loaves to regional specialties, there are endless ways to infuse your baking with personal flair. Here are a few variations that will not only elevate your artisan bread recipe but also impress anyone lucky enough to enjoy your creations.
Rustic Whole Wheat Artisan Bread
This hearty option is perfect for those who love the nutty flavor of whole wheat. To make it, simply substitute half of the all-purpose flour with whole wheat flour. The result is a denser loaf packed with fiber and nutrients. Pair it with olive oil for dipping, or whip up a savory butter by mixing unsalted butter with garlic and herbs. Whole grains can be a bit heavy, so a longer rising time helps develop flavor without sacrificing texture.
Herb-Infused Artisan Bread
Bring a burst of flavor to your kitchen by adding fresh or dried herbs like rosemary, thyme, or basil directly into the dough. The aroma alone will have your neighbors knocking at your door! Consider using a blend of Italian herbs for a Mediterranean twist. You could even sprinkle some atop the loaf before baking for extra visual appeal. This simple addition transforms your artisan bread recipe into an elegant side for any meal.
Cheese and Olive Artisan Bread
Imagine a delicious, cheesy bread studded with olives and a touch of garlic—sheer bliss! Simply fold in crumbled feta or shredded cheese, along with chopped olives, into your dough before shaping. This adds wonderful texture and flavor. Serve it warm at your next gathering, or enjoy it with a bowl of hearty soup.
These variations not only change the flavor profile of your artisan bread recipe, but they also allow you to connect with your loved ones through the universal language of food. So why not embark on this flavorful journey today? Happy baking!
Baking Tips and Notes for Artisan Bread
Achieving the perfect crust
When it comes to an Artisan Bread Recipe, the crust is king. To get that delightful, crunchy exterior, consider the following:
- Steam in the oven: Add a pan of hot water to your preheated oven or mist the dough with water before baking. This creates steam, helping to develop that signature crust.
- Bake at the right temperature: A hotter oven (around 450°F) allows for a better rise and browning, resulting in a crust that’s irresistible.
- Use a baking stone or Dutch oven: These tools help retain heat and moisture, giving your loaf that artisan touch.
Storing your artisan bread
To keep your bread fresh longer, proper storage is essential. Here’s how to do it right:
- Cool completely: Allow the bread to cool on a wire rack before wrapping it; this prevents moisture buildup.
- Wrap in a cloth: For short-term storage, a clean cloth is ideal. For longer storage, consider using a plastic bag or bread box.
- Freeze for freshness: If you can’t finish it in a few days, slice your bread and freeze it. Just toast or let it defrost when you’re ready to enjoy!
For further tips on bread storage, check out this helpful guide.
Serving Suggestions for Artisan Bread
Enjoying with dips and spreads
Artisan bread is a delightful canvas for a variety of dips and spreads. Think of creamy hummus, zesty pesto, or even a rich bruschetta. You can easily mix and match these flavors to enhance your Artisan Bread Recipe experience. For a simple yet delicious option, try spreading some cream cheese topped with fresh herbs or a drizzle of honey.
When gathering with friends, set up a charcuterie board featuring your favorite spreads, cheeses, and an assortment of vegetables for dipping. This friendly setup encourages sharing and makes your homemade bread the star of the show! For more inspiration, check out the Mediterranean Dips guide for different ideas that’ll impress your guests.
Pairing with soups and salads
There’s nothing quite like pairing warm, crusty artisan bread with comforting soups and salads. Consider enjoying your bread alongside a hearty butternut squash soup or a light chickpea salad. The flavors of the bread complement the freshness of the salads nicely, creating a satisfying meal.
If you’re looking to elevate your dining experience, think about making a quick Tomato Basil Soup from scratch or a comforting beef stew on a chilly evening. The best part? You can tear off pieces of your artisan bread and soak them in the savory broth—pure bliss! Check out Soups You’ll Love for some great recipes to accompany your bread.
With artisan bread at the center of your meal, you’re set to impress anyone at the table!
Time Breakdown for Artisan Bread
Baking your own artisan bread is a rewarding experience that requires some patience and love. Here’s a quick time breakdown to help you plan your baking day effectively.
Preparation Time
You’ll spend about 20 to 30 minutes gathering ingredients and mixing the dough for your Artisan Bread Recipe. It’s the perfect time to get your favorite playlist going!
Rising Time
This is where the magic happens! The dough needs to rise for approximately 1 to 2 hours. Sometimes, I like to let it rise a bit longer for extra flavor. Just be sure to check on it occasionally.
Baking Time
Once your dough has risen, preheat your oven and bake for around 30 to 35 minutes. The aroma that fills your kitchen will be worth the wait!
Total Time
All in all, you’re looking at about 2.5 to 3 hours from start to finish. This gives you ample time to enjoy a cup of coffee while the bread is rising!
For an in-depth look at how to perfect your artisan bread, check out resources like King Arthur Baking and America’s Test Kitchen. They’ll guide you through mastering this exquisite skill!
Nutritional Facts for Artisan Bread
Calories per slice
When indulging in a slice of artisan bread, it’s helpful to know that each piece typically ranges from 70 to 120 calories, depending on the specific ingredients and portion size. If you’re curious about how to fit this delicious treat into your daily caloric intake, consider enjoying it alongside fresh vegetables or lean proteins for a balanced meal.
Nutritional benefits
The Artisan Bread Recipe offers more than just warm, crusty goodness. Here are some of the standout nutritional benefits:
- Whole Grains: Often made with whole grain flours, artisan bread is a great source of fiber, which aids digestion and keeps you feeling full longer.
- Nutrients: It contains essential vitamins and minerals such as B vitamins, iron, and magnesium, which support energy production and overall health.
- Low in Preservatives: Homemade or authentic artisan bread generally avoids preservatives and artificial ingredients, making it a healthier choice compared to store-bought varieties.
Learning about these benefits can inspire you to whip up your own batch of artisan bread or explore the amazing options available at local bakeries. Check out more insights on the nutritional advantages of whole grains at sources like Harvard Health or the Whole Grains Council. By becoming aware of what’s in your food, you can savor each bite even more!
FAQs about Artisan Bread
Can I use different types of flour?
Absolutely! In fact, experimenting with different flours can give your artisan bread a unique flavor and texture. The classic all-purpose flour works great, but consider trying bread flour for a chewier bite, or whole wheat flour for a heartier taste. You can even mix flours, like adding rye or spelt, to create your desired profile. Just remember, different flours absorb water differently, so you may need to adjust your liquid ingredients.
How can I achieve a crustier loaf?
A well-developed crust is one of the hallmarks of a great artisan bread recipe. To elevate your crust, try these tips:
- Steam: Use a pan of hot water in your oven to create steam while baking. It helps the bread rise before the crust sets.
- High Temperature: Bake your loaf at a higher temperature, around 450°F (232°C). This promotes a nice golden crust.
- Score the Dough: Just before baking, make slashes on the surface of your dough. This not only looks beautiful but also allows the bread to expand properly.
What’s the best way to store leftover bread?
To keep your artisan bread fresh, it’s essential to store it properly. For short-term storage, wrap the bread in a clean kitchen towel or paper bag—it keeps the crust crispy while minimizing moisture. Avoid plastic as it can make the crust soft. If you have leftovers after a few days, consider freezing slices. Just wrap them well in plastic or foil, and when you’re ready, pop them in the toaster for a quick refresh.
For more information on bread storage, check out King Arthur Baking. They have detailed guides and tips for maintaining your baked goods.
Baking is all about experimentation. Enjoy the process, and happy baking!
Conclusion on Artisan Bread
Embrace the Art of Home Baking
Baking artisan bread at home is not just a culinary endeavor—it’s a rewarding journey. With each loaf, you’re not merely following a recipe; you’re creating something unique, infused with your personal touch. The transformation of simple ingredients into a deliciously crusty loaf is nothing short of magical.
Remember, practice makes perfect, so don’t be discouraged by early attempts! Each bake will enhance your technique and deepen your understanding of flavors. Consider exploring various add-ins, like herbs or dried fruits, to make your artisan bread recipe truly your own.
For a deeper dive, there’s a lot of helpful information available at sites like King Arthur Baking and Breadtopia. Happy baking!
PrintArtisan Bread Recipe: Easy Steps for Fresh, Delicious Loaves

Learn how to make delicious and fresh artisan bread at home with this easy-to-follow recipe.
- Prep Time: 15 minutes
- Cook Time: 45 minutes
- Total Time: 18 hours
- Yield: 1 loaf 1x
- Category: Breads
- Method: Baking
- Cuisine: Italian
Ingredients
- 4 cups all-purpose flour
- 1.5 teaspoons salt
- 1.5 teaspoons instant yeast
- 1.5 cups warm water
Instructions
- In a large bowl, mix together flour, salt, and yeast.
- Add warm water and stir until a shaggy dough forms.
- Cover the bowl with plastic wrap and let it rest for 12-18 hours.
- Once risen, shape the dough and let it rest for 30 minutes.
- Preheat the oven to 450°F (232°C).
- Place a Dutch oven in the oven to heat up.
- Carefully place the dough in the hot Dutch oven and cover it.
- Bake for 30 minutes covered, then 15 minutes uncovered.
- Remove from oven and let cool before slicing.
Notes
- For a crustier bread, use a baking stone.
- Experiment with different types of flour for unique flavors.
Nutrition
- Serving Size: 1 slice
- Calories: 120
- Sugar: 0.5g
- Sodium: 290mg
- Fat: 1g
- Saturated Fat: 0g
- Unsaturated Fat: 0.5g
- Trans Fat: 0g
- Carbohydrates: 24g
- Fiber: 1g
- Protein: 4g
- Cholesterol: 0mg
Keywords: Artisan Bread Recipe, Homemade Bread, Fresh Bread